Sunday, December 27, 2009

Lemon Ginger Tea


About 3 inches of ginger, grated
A small saucepan of water – 5 or 6 cups
3 lemons, juiced
¼ cup honey

Grate the ginger into the water; bring to a boil. Reduce to simmer for about 30 mins. Strain into a teapot. Add lemon and honey.

After tasting a lemon ginger tea at a restaurant, I searched and experimented for the perfect recipe. This is my version.
This makes a very zippy brew. Adjust to make it more mellow by reducing ginger and/or lemon if you please. It is also great iced. 

Waffling


We like waffles. We do not, however, own a waffle iron. Luckily, our friend Molly is out of town this week and allowed us to use hers! Not luckily out of town but luckily let us borrow. Dave, in his usual half-assed way, decided to simply use the recipe from the Betty Crocker cookbook while Renee wasn’t looking. Several months prior, we watched an episode of Good Eats devoted to waffle making, and Renee wanted to try Alton Brown’s recipe. But it was too late, Dave had already begun. He was persuaded to sub some of the while flour for whole wheat. We started cooking and sampled the first one that came out. It was, in a word, horrible. Renee said she thought it tasted like ice cream cone, while Dave likened them to plain dry toast. They were way too crispy and flavorless. We continued cooking until we ran out of batter, but as we went on, the idea of eating these flavorless discs of death became less and less appetizing.

So the decision was made to start over using Alton’s recipe. This was a pretty major undertaking: facing the prospect of another batch was daunting when already faced a pile of “waffles” that were already finished and a messy kitchen. Not to mention the waste. But one taste of those communion wafer flavored  (and textured) waffles would have convinced anyone to do the same. We pressed on and made the new recipe. There were some pretty big differences – 3 times as much sugar and butter – destined to be better, right? -  an additional egg, 3 times less baking powder and some baking soda and whole wheat flour! These waffles were fluffy, sweet and all around delicious. Two hours after we started the waffle debacle we settled into eat our breakfast and watch Roseanne. It took forever but was well worth it for our exquisite brunch. Don’t worry, we fed some of the yucky waffles to the birds and put the rest in the compost.


Waffle Fail.


Waffle Win!

Thursday, December 24, 2009

Mitten Cookies

It's December 24th and quite chilly in Colorado Springs. We decided to celebrate the holiday season by making some wintery cookies. We made sugar cookies from the Betty Crocker cookbook, cut them into mitten shapes 


and sprinkled them with granulated sugar. They turned out poofier and softer than we initially expected, but hit the spot regardless. 


We had a little extra dough and made a few special cookies. Renee made some thumbprint style cookies with raspberry jam. Dave made a snowflake - but of course you knew that from the picture! 

Tomorrow we are making chili and hope to blog about that as well.  

Monday, December 7, 2009

Why Buy Crackers?


A new discovery of ours is how simple it is to make crackers and how much more delicious they are than any cracker we have ever tasted before. We made this discovery out of necessity – we wanted cheese and crackers but didn’t have crackers so we made them. We cut bread in very thin pieces, less than a quarter of an inch, applied an oil, salt, and pepper mixture we made with a brush, and toasted until crisp. Another variation we have tried is to rub garlic on the bread for a garlicky cracker – YUM!


Roasting Chickens

We cook chickens fairly frequently, a couple of times a month. It is a perfect food for us because we crave meat but try not to eat too much of it. By choosing the whole chicken we can feel good about using most parts of the bird without much waste. We typically get several meals out of the chicken because we eat the white meat on salad or in sandwiches, save the dark for soups or pot pie, and use the stock for soups. The other benefit of the chicken is that it is so easy to cook it takes hardly any time or effort. And if we are one thing that thing is lazy! Here is how the chicken goes.

Buy a whole chicken


Mash up butter with tons of pepper and salt


Peel back the breast skin and smear most of the butter between meat and skin. Spread the rest on the outside


Fill the cavity loosely – usually we use citrus fruit, garlic and onions. You should cut this stuff in half or quarters but leave the skin and stuff on


Bake in the oven and baste every half hour

Take the meat off when the chicken is still hot

Throw the carcass in a big pot of water, bring to the boil, then simmer for an hour or so (probably while you are enjoying your chicken dinner) strain and freeze


Pot Pie

*Note - several posts will be made today, as we have been sitting on four or five entries that for whatever reason (laziness) have not been posted.*


This entry ties in nicely with the last one because it prominently features our homemade pie crust! Dave has always loved pot pie. It is possibly his dad's most favorite meal, and a point of bonding between them, as his mom and sister don't eat much meat. The recipe we use for the filling is from the Betty Crocker cookbook, probably slightly modified but not much. One major plus for this dish is that it requires little preperation the day of the pie. We cook chickens at our leisure and then freeze the meat, so you just need to take it out of the freezer and thaw.

Combine that with some onions, frozen peas and fresh carrots (we have found it is imparitive to cook your carrots first for a few minutes to soften, otherwise you end up with crunchy hard carrots and it is not pleasant) and then all you need to do is make the sauce. This is a flour/chicken stock combo.


Bake for a few minutes and then let it cool! We have pictures here from our most recent and probably most mammoth pot pie. We are also looking forward to making a turkey pot pie with some of our thanksgiving turkey.


Pie Crust

Pie Crust


I would say pie crust used to be the most intimidating thing to me. Scary stuff, right??? Not too dry, not too wet, don’t touch it!!! Lard??? Are you kidding? That is hardened animal fat. Now I know lard is yummy and crust doesn’t have to be scary. But it can be. I make a very easy all purpose crust that isn’t award winning but it works. I know many people are wed to their recipe and the type of fat they use. Here is the thing: if you use lard it will taste better and be flakeier but you have animal bits in the crust and that, for some, is a turn off. That isn’t really the reason I don’t use lard. I just can’t make the leap to buying it. It is a line I haven’t yet been able to cross. So here is the current recipe I use, it is inspired by a Laurel’s Kitchen recipe but modified for my preferences. I use 1 c white flour, 1 c wheat flour, 1 teaspoon salt, 10 tablespoons butter, and some ice water. Cut up the butter into 1 centimeter cubes (totally an estimate). Blend the flours and salt in your food processor. Did I mention that the food processor is essential and the reason I got over my fear of crust? Ok, blend the dry. Pulse in the butter until you have a mixture of fine crumbs. Then slowly add the icy water a tablespoon at a time until the mixture starts to come together. Then dump it on your work surface and smoosh it together, it should stick if you put enough water in. That is the end. You smoosh and then store or roll.


I am not a cook or baker so I don’t know about this really but I have something to say about this “don’t over work the dough” thing. I do fear over working the dough because a tough crust is disappointing. However, I have never over mixed the crumbs of flour and butter. My experience makes me think that the over mixing comes with the addition of the water. So I freely mix in the butter, unafraid of over mixing. Then I back WAY off and add in the water slowly, drop by drop, until I see the slightest change of the dough starting to stick together. Then I STOP. It seems like you could always add more drops when it is on the work surface if you needed to.


This crust recipe only takes a couple of minutes but I still make several crusts at once and freeze the extras. Make crust and be merry!


Wednesday, October 28, 2009

Boeuf


Here is the thing… I have made beef bourguignon a la Julia twice now and I have not documented this with pictures. I am pretty into the recipe because it is such a marathon but I am not a beef stew fan. Of course beef stewed in bacon and wine is a step in the right direction. It is a crime because it is such a long process and I feel compelled to share it, a la Renee. I think this post will be much less interesting than if it had pictures. Of course our vegetarian friends probably don’t want to look at bloody hunks of beef.

I do as Julia says and get my beef bits and make stock from scratch which takes 5 hours. It isn’t hard work, you just throw the beef bits, leeks, onions, carrots, and maybe celery into the pot, cover with water. Bring it to a boil and then simmer for 5 hours. While that is happening you can brown the beef. I am not going to go into details because I will probably post about this later with full details including the kind of meat I buy and everything but I do think you should know that you must MUST dry your beef. Or it will not brown. DRY THE BEEF! Julia is pretty insistent on this and this tip was even featured in the motion picture Julie and Julia. I dry it with paper towels which can be pretty tricky since we don’t really keep paper towels on hand. In this case it was okay because I wasn’t cooking at our house. Anyways, you brown the meat, take it out of the pan, deglaze the pan with wine and cover the meat with wine and spices. Here is the a la Renee part, I put the meat in the crock pot. Julia makes it on the stove and in the oven. Really??? Why? It takes hours, use the crock pot. So I put it in there, when the stock is done, I add that and then crock it all for about overnight.

This time we served it over big whole wheat noodles, and Dave much preferred that. So that is how it all happens. Then Dave eats it every day all week. Which is pretty amazing since he has very low tolerance for left-overs.

Friday, October 23, 2009

Pizza Wrappin'

Pizza is Dave’s favorite food. We love to get pizza take out and appreciate all makes and models, from the junkiest greasiest stuff around to the delicious whole wheat crusted gourmet slices. Back in the day before we cooked, we bought a lot of frozen pizza, but also were big Boboli fans, coming up with our own combinations of toppings. While living in Massachusetts, we started buying pizza dough from Whole Foods and baking our own crusts. After we moved back to Colorado and Dave started learning how to make bread, it was only natural that he tried his hand at pizza dough. We went through a couple different recipes, but the best by far was from Heidi Swanson’s 101 Cookbooks website, modified by Dave. This recipe is super simple, and could be whipped together by anybody who can measure. It goes like this:

4 ½ cups flour (H.S. does all white flour but we use whole wheat as well. Renee likes a more wheaty crust, so most of the time we do 2 ½ cups white and 2 cups wheat. Sometimes Dave just does 1 cup wheat though.
1 tsp yeast
1 ½ tsp salt
1 ¾ cups cold water
¼ cup olive oil.
We like a honey wheat crust, so we always add ¼ cup honey as well, unless we don’t have any on hand, which is an extreme rarity.

You don’t have to let the yeast proof or anything, just put all the dry ingredients in a bowl and then add the wet. Since the honey is sticky, it helps to dilute it in the water. Mix it all up with a big spoon and knead for a few minutes. Then you can divide the dough – we like to divvy it up into 3 equal pieces. Let it sit out on the counter covered with a kitchen towel for 45 minutes, and you are ready to roll! The dough keeps very well in the freezer, just take it out in the morning and it will be ready for you to work with when it’s dinner time. We have been known to either forget to take out dough or not decide what to have for dinner until it is dinner time, in which case you can take the frozen lump (we either store ours in Ziploc bags or in Tupperware) and submerge it in hot water. It will be thawed in about 45 minutes.

Now, as for toppings, we always buy big blocks of mozzarella from the Whole Foods and shred it ourselves – less packaging and fresher taste. Since we don’t like canned or jarred pizza sauce and it’s something of a pain to put together, we usually opt for olive oil and pulverized garlic for sauce. We will try just about anything on pizza crust at least once. One of our very favorite possibly weird sounding pizzas is the aforementioned cheese and oil with Brussels sprouts that have been cooked with bacon and oil in the oven. So good. We do a Caesar salad pizza which we stole from Veggie Planet, most likely the best pizza place on earth. Homemade meatball pizza is always good. Most recently, we made one with goat cheese, apples, and caramelized onion. We have never had good luck making caramelized onions but this batch came out very nicely. Take a look at a picture of said pizza!


To be honest, I (Dave) don’t have too much to say about these wraps – they were delicious and mostly homemade. What we have here is store-bought tortillas of the jalapeno cheddar variety. Then we have our homemade hummus, which is ridiculously easy to make with our spiffy food processor. Then goes spinach and also some parmesan cheese.
The coup de grace is delicious fried chicken that we made with our totally sweet cast iron skillet. These wraps were very very tasty.


Side note: isn’t it hard restraining yourself to only put as much food in the wrap as will fit? When the tortilla is all spread out and unwrapped, it looks like it can hold much more than it actually can. Usually this results in some messy splitting.


Tuesday, September 15, 2009

remember bobby blue?


I do (renee). I was having a hard time getting out of bed on Sunday morning which I need to do to ensure I can sleep Sunday night. Anyways, I was having a hard time getting out of bed and I remembered bobby blue. Soft, luxurious bobby blue malabrigo. malabrigo in general. I was thinking about this shirt/sweater that I want to knit with malabrigo but I bought black. Why didn’t I buy a beautiful variegated color? I remember when amy c. first brought my attention to bobby blue when decided on it for her first sweater. There were a lot of great things about working at spark and a number of shitty things but nothing like the frustration of trying to get orders from malabrigo. Eh, I don’t think the bobby blue ever materialized. I haven’t wanted to knit in a long time, I am not sure why. I used to knit all the time, all day every day. I haven’t knit in a year, and didn’t knit much in the year leading up to the past year. I have been more interested in sewing, which reminds me I must post about the shirt that I made. But Sunday morning my yarn was calling to me. I went through my craft bins a week ago and reorganized everything, it was fantastic. I am sure that exercise, plus the nip in the air on Sunday that opened my mind to malabrigo. That and the fact that I spoke to someone about starting a group for knitters to finish projects – only those in progress with some sort of reward in place when you finish a project. Any ideas? What would be a good reward besides the satisfaction of a job well done and a new sweater to wear? Anyways, now I can’t stop thinking about malabrigo…except when I pause to think about the Zypher Style rusted root shirt I want to make.

Come On and Squeeeeze Me

Short post about music: Dave did 2 open mics last week, one at Raven's Nest Coffee and one at Trinity Brewing Company. Raven's Nest was great as usual and not too busy so Dave played 8 songs! They were:
Don’t Worry About the Government (Talking Heads)
Loretta
Melinda
Squeezebox (The Who)
Billy
Undisclosed
When I'm At Your House (Loudon Wainwright III)
Smoking Jacket
Not in that order though.

For Trinity, it was only the second time they held the open mic there and Dave's first time playing. He was the only one there to play besides the host, so he got to play 10 songs. They were (again not in this order):

Loretta
Squeezebox
Billy
Undisclosed
Westward
Smoking jacket
She belongs to me
Norwegian wood
Boxcar Blues
Kathleen

Nice to get out and play and practice.
Dave wowing the crowd at Trinity! They were all ghosts.

The Teaches of Peaches


Peaches! Nature’s candy, dontcha know? (I think actually that is beets, but peaches are good too.) Colorado is famous for its peaches, and we wanted to take full advantage of that. At the farmer’s market we frequent, there is a vendor who sells delicious and expensive palisades peaches. This takes place in mid-August, by the way. We are still kind of behind with our blog.
We had tried, with the help of our friend Molly, to procure a box (approx. 25 lbs) of “seconds” peaches (peaches that aren’t perfect enough to sell for their usual $1.50 each) at the farmer’s market for the previous two weeks with no luck. The first time, the vendor said that we had to get there before 9. Molly went the next week at 8:30 and said you had to get there before 8. So the following week I got up early and made it to the farmer’s market at about 7:45. They must have had 25 boxes for sale. I paid and brought them home. Some of them looked kind of funky, some just bruised, some with no visible defects at all.
Our plan was peach salsa and cobbler. For the salsa, we wanted something pretty spicy while maintaining a sweet peachy flavor and we found what appeared to be a reasonable recipe online for peach salsa. So Molly, Dave, and Renee proceeded to listen to music, dance around the kitchen, and make peach treats. The first step was to remove the skin from all of the peaches. This was quite an ordeal. Supposedly, you should be able to dunk a peach in boiling water and the skin comes right off. This is not so true with peaches that are less than ripe. We had to peel them all by hand. How many we do not know – it seems like 25 pounds of peaches equals a million peaches when you are peeling those slimy bastards by hand. Anyways, they managed to get peeled, pitted, and cut. Salsa time! We used peppers (bell, jalapeno, and banana) both from the farmer’s market and our garden (see the light green banana peppers in the bottom of the picture? Those lovelies are from our garden). Tons of garlic and onions and about 15 pounds of peaches. Throw it all together and cook it for a bit. Prep canning supplies. Maybe we did a double recipe, maybe it was quadrupled. The great thing about the salsa, as opposed to the relish, is that it doesn’t require weeks to develop its flavor and you can taste before you preserve and be pretty sure of how it will taste. So we tasted, perhaps to excess, it was very spicy and delicious. Then Molly and Renee made sure the salsa got into jars and preserved. The first time Renee canned (see the relish debacles) she was alone, and while it wasn’t terrible, it wasn’t great. There was much more salsa, it was slippery and pretty out of control. There would have been tears if Molly wasn’t there to make the job much easier and maintain a fun mood. You need friends around to make burning yourself on molten peach sludge funny instead of a tragedy. And to rescue you when you dunk your fingertips into boiling water in a desperate attempt to get a jar. You need people you like around to make cooking fun instead of work. Well, we do. Luckily, there was some salsa that didn’t fit in a jar and we were able to indulge in chips and salsa and gossip.

Half of the peaches were reserved for the cobbler. After the salsa making and dinner, Renee and Molly crashed into laze watching Freaks and Geeks. Dave disappeared into the kitchen to whip up the cobbler. It was a pretty easy recipe – throw some sugar and flour on the peaches, put them in a bowl and then top them with a biscuit dough. Our new food processor makes it so easy to make biscuit or pie dough. Then it gets baked and voila! Unfortunately, we can’t describe how good this cobbler was. It was so good that… it was so good. (pardon the messy stove.)

Friday, September 4, 2009

Anadama Bread

Second post of the day!! I (Dave) have been commissioned to write a blog post about anadama bread. This special and unique bread is most well known in the New England area. In Colorado, people have no clue what it is. Basically, it is a bread that is made with a mix of whole wheat and white flour, and has molasses and cornmeal added to give it a very distinctive flavor and texture. There are some tall tales floating around as to how the bread got its name. It basically revolves around a disgruntled husband not wanting to wait for his wife to get around to making the bread, or who is unpleased with the daily dinner of cornmeal mush, so he throws the ingredients in a pan, bakes it, all the while exclaiming “Anna! Damn Her!” True story? Who cares, it’s good bread.

You start with a half cup of molasses, a half cup of cornmeal 
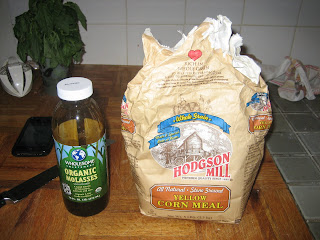
and 2 tbsp. of butter, with some boiling water added to make the meal mushy. That needs to sit until it is cool. Then, activate your yeast. I use a tablespoon, with a pinch of sugar and 2/3 cup of hot from the sink water, not boiling – too hot for yeast! Once it starts to get foamy, you can combine it with your mush. You will add 2 cups of whole wheat flour and salt – don’t forget the salt. It is amazing, the weird things that happen to bread when you don’t put salt in. One of the many times I made this bread without salt, I cut into it and it was completely hollow in the middle! I don’t get it, because I am not a scientist. Also, it tastes horrible.

After this is mixed up well, add white flour. I add a cup at a time, mixing up until it is too hard to mix. Then turn it out onto a floured work surface and apply more flour – it will still be pretty sticky. I think I usually add about 2 ½ to 3 cups of white flour to the mixture before it is done. Then knead. Knead ‘till you can’t knead no more. About 10 minutes. Put some vegetable oil in a bowl and throw your dough in there. I let it rise for 1 ½ to 2 hours. Take the dough out of the bowl, knead it a bit, and then form it into loaves. We usually do one big sandwich loaf of this bread, but it works very nicely as two round loaves, especially if you are going to use it on its own with some butter instead of for sandwiches. Let your loaves rise for about 45 minutes – if you do one big sandwich loaf it is going to get huge and saggy, so don’t let it over-rise.

This is how it will look right before it goes into the oven. Preheat your oven for 400 – the recipe says 350 but I always bake bread at 400 – and when it is time to bake your bread, throw ½ cup of water in the bottom of the oven. The steam is good and helps you form a crunchier crust. 45 minutes does the trick for one loaf, and 40 minutes is long enough for smaller loaves. Put it on a cooling rack and let the bread cool completely before cutting into it if you can help it.


Check out the crumb on this loaf!

It is a pretty easy bread to make, and always comes out right providing you remember all the ingredients. Enjoy!


Cucumber sandwich on anadama bread

Folks Fest '09

We are way behind in our blogging. I apologize for that. So we are going to take a trip back in time to tell you about the Rocky Mountain Folks festival. This is a festival we attend every year that we can – this is our third time. The festival is a three day event, spanning from Friday to Sunday. We decided to leave Thursday afternoon to set up camp at the beautiful Meadow Park campground. We were pretty lucky weather-wise, compared to last year’s festival, which has been dubbed “Soaks Fest” – it pretty much rained continuously for the three days we were there. This year’s weather was much more comfortable, with a couple showers here and there to keep the temperature down.
We wanted to spend as little money at the festival as possible, since things tend to be so expensive – a Chipotle style burrito costs $8, with a dollar for guacamole, for example. So we made TONS of food and brought it with us. Dave made 2 loaves of herb bread and 2 baguettes. Renee made hummus and chopped lots of fresh veggies. She made pesto chicken salad, which consisted of chicken that we cooked, pesto we made from fresh Colorado basil in our food processor, and mozzarella cheese. It was great, if a little too cheesy.

She also made phenomenal trail mix that featured candied almonds (which we did ourselves), soy nuts, dried cranberries and apples, and chocolate chips. When we were sitting out in the sun and had our trail mix out everything got a little melty and sticky, which produced delicious trail mix clumps. Those were the best. We also brought fresh fruit (like bananas, which Renee is holding in that picture and also making a funny face), and salami and cheese for sandwiches. We feasted like royalty for those three days, allowing ourselves to buy one festival snack on Sunday, and going to Oskar Blues brewery on Saturday afternoon to break up the day and support Colorado’s local breweries.
We saw some great musicians perform, like Mary Gauthier, Rufus Wainwright, Susan Tedeschi, and one of our very favorite acts, Gillian Welch and David Rawlings. The number of amazing acts we have seen in the 3 years we have attended is pretty mind-blowing: Todd Snider, Loudon Wainwright III, Dar Williams, Arlo Guthrie, The Mountain Goats, Lisa Loeb, The Mammals, Jackie Greene, Greg Brown, The Waifs, and Kasey Chambers to name a few. We are so lucky to be able to live close enough to Lyons, CO to be able to attend. It is one, if not the, highlight to every year for us. Jealous?
Mary Gauthier and her friend. She pretty much rocks my world.

Wednesday, August 19, 2009

The Art of Corona St. Cooking

This post is going to be about food. We love food, in case you haven’t noticed. We are obsessed with growing veggies, buying delicious ingredients, cooking elaborate feasts, and savoring every morsel. Today, we are going to talk about bread, giant sandwiches, and veggie tacos.
I know that we have talked about Dave’s bread baking in the past. These are just a couple of newer creations we’ve tried out. Looking back on our blog, it seems we have already talked about the herb bread we make with the fresh herbs from our garden, so I won’t go into that too much, except to say that this one was made with mostly just lavender, which made for a unique and delicious tasting loaf.


Pre-Cooked


Post-Cooked

The other thing we did was make rolls! Rolls are something that Dave has always wanted to experiment with but never did. We made a double batch of French bread so we would have a huge loaf for our giant sandwich. But it was just too much dough to work with, so we cut some off, formed it into little balls, and presto! Scrumptious rolls! These came out pretty much like white dinner rolls. Dave did some nice slashing action before they went into the oven, and they came out looking pretty professional.


This brings us to the Godzilla sandwich. We baked the aforementioned loaf, which was about 50% bigger than normal. We got delicious fresh produce, mostly from the Saturday farmer’s market and including our own homegrown cucumbers. I believe we had peppers, lettuce, tomatoes, cukes, onions, avocado, provolone cheese and mayo. This is one of our favorite meals in the summertime. You make it and cut off a hunk to eat right away, then put it in a bag and refrigerate it. If you can wait until the next day, it’s even better because the bread gets a little softer and the flavors all meld together. Really easy to do and so good. We don’t eat it when the veggies aren’t in season though, because it seems to lose something.


Lastly, we will talk about taco night. Our friend Molly recently moved back to Colorado Springs, and came over one night last week to make dinner with us. She has a great recipe for veggie tacos that she has perfected over the years. They include bell and spicy peppers, onions, corn and black beans, all thrown in a pan and let to cook down and get delicious.

We supplied the tortillas – we learned of these uncooked tortillas from our other friend Lin that you can get at Costco. They look just like flat white discs when you take them out of the bag.
You put them in a hot frying pan for a few seconds on each side and they puff up, get brown and are so much better than the pre-cooked ones you get at the grocery store. If you go to Costco, pick some up. They are also delicious as desert with cinnamon, sugar and butter. So, the veggies cooked, the tortillas puffed up, some cheese and sour cream was added at the end, and voila! These tacos were so quick and tasty. We had enough for leftovers the next day, which were great too.
We read an article last week published in the New York Times by food genius Michael Pollan. http://www.nytimes.com/2009/08/02/magazine/02cooking-t.html?_r=1&scp=2&sq=michael%20pollan&st=cse
He talked about how far things have come from the early 1960s, when Julia Child’s The French Chef premiered on PBS. He wrote that since then, food companies have taken the preparation – and essentially the food – out of cooking these days. Parents can buy pre-made frozen peanut butter and jelly sandwiches now! Yes, everybody is so busy these days working harder than they have had to in a long time just to make ends meet. But making food doesn’t have to be so laborious, time consuming and expensive to be homemade and fresh. We have learned over the past year or so that cooking can be a most rewarding and enjoyable experience. It is sad that so many people see preparing a meal as a tedious chore and not worth spending time on. A potentially deadly downside to buying prepackaged food-like product from the grocery store or loading up on fast “food” is that you have no idea what you are eating. So if you have the opportunity, get in touch with your food. Take an evening to shut off the TV, recruit friends and family, and cook a meal. Then do it again.